Showing posts with label Rohan. Show all posts

Thursday, June 11, 2026

The Power of the Disengage - Why I'm losing games

It's probably quite obvious on this blog, but I'm quite the fan of Rohan and its cavalry forces. It was likely witnessing the Ride of Rohirrim at Pelennor in my formative years, and it's a very common story for a lot of players. Now, Rohan in the latest edition struggles to properly recreate that moment on the tabletop, but with luck, canny hero usage and good timing for the charge and use of Army Rules, you can get some fantastic results with the Riders of Rohan charging through some Orcs.

In general practice though, Rohan excels much more as a skirmishing force, as many of us know well. Throwing Spears and Bows on cavalry makes for a tough force to pin down without taking casualties, and they are able to kite and still cause damage. When coupled with the likes of Eomer, Theodred or Helm Hammerhand coming crashing through your lines with a few Royal Guard, you have an effective list for frustrating your foe and keeping the initiative, assuming you have the skills.

This is my failing in recent games however. Using Riders of Eomer within a Doubles tournament and a Rohan-cavalry-heavy Realms of Men list in a practice game, I have noticed an unfortunate trend in my piloting of cavalry. I get tunnel-visioned into the charge, quite often re-charging a battleline and leaving myself open to counter-charge. I've gotten better and leaving that relief force behind for a second-turn charge, but there's still issues with how I'm playing. Let's get into it.

The Doubles Tournament

This tournament back in April was my girlfriend's first real look at competitive MESBG. I've corrupted her thoroughly with a love for The Lord of the Rings (that latent nerdiness hit hard), so when she found she enjoyed the game after a few home practice matches, it was great to have her volunteer to accompany me to a Doubles event. If you've read the previous post on building an Ent, I went into this a little there.

Our Alliance in force, ready to take the fight to the White Wizard

So how did the event go?  I was outwardly confident, particularly due to the power of the Ents and free Heroics on Eomer. Three games across a single day with two 400pt lists using the Doubles scenarios from the Matched Play guide, and the final result was 1 Win, 2 Losses. We both had a tonne of fun, and the first two games were thrilling for different reasons, but by the third tiredness was setting in and a difficult game definitely left us disheartened.

The issue I believe was actually how I personally played my cavalry. Let's break it down.

Game 1 was against a Khazad Dum-Riders of Eomer alliance. My intention had been to try and focus down the opposing cavalry and support the Ents against the large group of Hearthguard dwarves. The high defence coupled with F5 and Burly just wasn't a prime target for my Riders. Deployment however put this very group of Dwarves right in front of Eomer, and so I tunnel-visioned right at them. The initial charge went ok, but I was ahead of the Ents and they were at least two turns away from supporting me, though rocks were flying in from the Ash Ent and hobbits. Erkenbrand's warband was also off to the far side offering fire support, which did to a semi-decent job of keeping part of the opposing cavalry back for fear of losing horses.

The smart move would've been to drop back after that first turn, take some pot shots, then charge back in once the Ents were in combat support range. Instead I stayed in close, and got counter-charged by the opposing Eomer. He Heroic Combated through a couple of Riders and my banner, and took part in killing his counter-part alongside Durin. This left the Ents vulnerable to being outnumbered, and whilst they did acquit themselves well particularly with Hurls keeping the enemy heroes on their backs, the Oak Ent eventually fell allowing for our force to count as Broken. Unlucky rolling on the Ent's special Brutal Power also left us one short on a VP goal to get a draw.

It might not sound like it, but the game was actually fairly close and tactically interesting. Our opponents were also both fun players and I believe we gave them our Most Sporting vote. 

Game 2 was against the event's ringer, Dale Groves. Always a good lad to play against, he was incredibly helpful and welcoming, recognising my girlfriend as a newcomer. His Gundabad list looked scary but luck with combats, Gabii's love for Hurl's and some helpful pointers from Dale himself saw us tear through the Berserkers, and even take down Azog and the Troll Brute quite efficiently. 

The difference here is clear in hindsight. Deployment saw the Ents in the centre with my cavalry at the back of the board. This meant the Ents were first into combat and my Cavalry could support them as I'd always intended whilst building the list, guarding the flanks and grabbing objectives whilst being a threat with their bows.

If only I'd remembered that lesson.

Game 3 was against a Reclamation of Osgiliath-Khazad Dum alliance. It promised to be as tough as it sounds, a bucket-load of high Defence models led by Boromir and yet another Durin. A river down the centre and a split deployment could've been a challenge, but we were able to ford the river with the Ents and reunite with our full might to bear on the Dwarves, leaving the Gondorians to run for several turns and get bottlenecked at the river.

It should've been so easy, and my initial charge tore through a good number of dwarves to keep them pinned in. The failure came in the follow-up again of course, not utilising Hit-and-Run tactics against a much slower force and ultimately I even ended up blocking out Treebeard, one of our most powerful combat pieces. He spent far too many turns behind Eomer and the Oak Ent, unable to help except with thrown stones.  Boromir got into play as well, despite us shooting out his horse. In getting overly focused on having Eomer trying to protect the Oak Ent with his Heroic Strikes against Boromir, I ultimately lost my leader again, and Treebeard failed to get into the fight until late in the game. 

We were ground down by the troops and lost simply due to lost initiative. The cavalry wasn't charging, the Ents weren't Hurling and our most mobile troops were little more than roadblocks instead of support. It left a sour taste in the mouth, simply for my choices essentially outplaying our own army.

A lot to learn, and realistically I just need to take a step back once I commit my cavalry. Had I faded back in both Game 1 and Game 3, the story could've been much different.

Easier said then done...

Realms of Men Practice Game

For this game, I was testing out the idea of running Realms of Men at an upcoming Teams event, and essentially built a list that was "Fields of Celebrant at home".

With this list I wanted to match a decent Gondorian battleline with the power of F5 cavalry, needing a Rohan General to give that bonus to the Royal Guard. On paper it's pretty good, with a lot of options for controlling the battlefield. A solid defensive battleline bolstered by two F6 Strike Heroes, a contingent of shock cavalry that can skirmish, scouts, light infantry and decent bow line and in particular a Bolt Thrower constricting enemy movement.

I went up against fellow Brumdabad team member Matt, who had brought along his Host of the Dragon Emperor list, featuring Rutabi. With the scenario being Stake a Claim, my cavalry should allow me to get early fortification points and it does, especially with Matt skirting terrain to avoid being targeted by the Bolt Thrower. 

Where it goes wrong is the right-flank. Rutabi's warband is small, but not enough to ignore. I could either cede the flank to her and risk bow-fire in the back, consolidating my forces against the Emperor, or go for a swift kill. With the combo of a pike-support Knight of the White Tower and my Rohan King, it's certainly doable to take down the Easterling Hero. 

A winnable fight, if managed well.

It doesn't go that way, I missed that the flank had enough space for the War Drakes to get around, meaning the Rohan King would only split the combat, and then he goes and whiffs the Heroic Combat anyway. Worse, the risk goes against me even further, as on the following turn, whilst I am able to win a Heroic Move off, it turns out that I had in fact blocked my King in with the Banner. I am able to charge and bring in Royal Guard reinforcements, but not being able to tactically retreat sees a good portion of my cavalry pinned in unequal fights. 

Rutabi ultimately brings down both the Knight and my King. I do lose the game in the end, though the Fortification points are fairly equal. Notably I also misplayed the Gondorian battleline on this one, again tunnel-visioning on getting into combat. Had I instead moved to the right, it would've forced the Emperors warband to cross open field to engage me, leaving the his flank open to the Bolt Thrower.

I should really get my eyesight checked.

Lessons Learned

So the takeaways from all this, aside from needing to step-back and see the bigger picture.

First: All the timing and positioning in the world won't help a good cavalry charge if you just get bogged down with it in the following turns. I've already learned the relief-force method, and that helps, but I need to recognise when to disengage, especially with Rohan cavalry who struggle with their statline but can still cause damage at range. I've spent too much time cycle-charging cavalry units in Total War not to understand this.

Second: Escape and reinforcement avenues. It's all well and good getting off a good charge if I then block off elite infantry or monsters from getting into help as well. Cavalry is there to make the hole, the infantry (or Ent) is there to plug it! 

Similarly, not blocking in my heroes. MESBG is 100% a game about mobility, and the Heroic Move is one of the core facets of that. Whilst the banners and backup needs to be close, if the the Hero can't move back, he can only go forwards, often into two, three or even four enemy infantry looking to kill him on the opponent's Move Phase.

Third: Perhaps don't fight if I don't have to. Many scenarios have objectives and rushing those, perhaps to take off the token defenders my opponent has left, is often more of use than charging headlong into a fight. Perhaps engaging in a slightly different location gives some penalties to my opponent, like a siege engine shooting into their flank, or bottle-necking Gondorians at a river ford.

What else do you recommend, oh dear armchair generals? 

With the next event coming up, I'll be pivoting back to Defenders of Helm's Deep, so these lessons will be a little less of use for that particular set of games, but not without merit. We'll have to keep them in mind for when I next run cavalry, whenever that may be.

Thank you for your time once again. If you like what I do here, you can also follow my hobby progress via Instagram, where I can be found at @Manic.Hobbying. In any case, just your support being here is greatly appreciated, and I hope to see you again.

Until next time! 

Friday, June 13, 2025

Army of Edoras

Rohan has long been in a position of prominence within MESBG, if not in strength then at least in popularity. This hasn't changed in the new edition either, with eleven Rohan lists available, plus three soupy lists (Realms of Men, Defenders of the Pelennor and Men of the West) that feature them prominently, and even here you could run them as basically all Rohan if you so desired. You can also run them in nearly every flavour; full cav, full infantry, mixed-arms, all heroes, with elven allies, with Gondor allies, with forest-people allies... an exhaustive list, and it can be overwhelming on choosing what to actually run.

I've been slowly making my way through the different lists, but with the starter box being focused on the War of the Rohirrim in the time of Helm Hammerhand, my latest is the Army of the Edoras. (Defender's of the Hornburg is fine, but I like the greater options available). Part of my reason for writing this blog is because I've not really seen this list covered anywhere, and whilst I'm not a strategic genius by any stretch, I think this list as some great options and the legs to do real well competitively.

So without further ado, let's have a look at the list, starting with the Heroes. Grab a cuppa, this might be a long one.

HEROES

Heroes of Legend

Helm Hammerhand, King of Rohan

The big guy himself is the only Hero of Legend in this list, and comes in at a cool 160pts (185 with his horse, which obviously you're taking. For this you're getting an F6, S5 Burly combat hero with 3's in all the right places, plus Strike and Strength where you need it. He can also call Heroic Combats for free, which is very nice for hero that is so clearly designed to splatter things. Strength 5 with a two-handed weapon is going to see him killing most things on 3's which makes him incredibly reliable on the charge. This strength is also fantastic for taking on the tougher high-defence monsters that are running around everywhere where other mere Strength 4 heroes may struggle.

He does have downsides to this combat prowess however. F6 isn't quite what it was, so he may be reliant on Strike against other heroes of his calibre or the monsters you want his Strength to deal with. He likely will lose the odd combat, but thankfully he has D7, 3W and 3F to keep him alive, plus an armoured horse.
His Into The Fray rule also will be forcing him to charge once he's made his first kill of the game, leaving him vulnerable to kiting and getting trapped. He's not quite as bad as Theodred or a grieving Eomer, as you can at least choose when to have him start charging and killing, but you will have to be mindful of when and where to commit him.

Helm comes with some extra more minor rules. Being the King of Rohan he of course has Expert Rider and Horse Lord, always nice for keeping his mount alive and staying mobile. He also has The Hammerhand which means he is never considered unarmed, nice for those rare times an opponent may look to steal or break his weapon.

Finally, for more army-wide benefits, he has Leader (Rohan Royal Guard), being the only hero in the list who can include them in his warband. He is also carrying the Horn of the Hammerhand which is not only nice for it's Courage bonus (much more useful this edition with all the monsters and Blades of the Dead about), it also has a once-per-game 24" -1 Courage bubble. Assuming you can break the opponent that could be very useful for ensuring more of them run away.

All in all Helm is an impressive profile, but not necessarily a top tier hero. He's got a good chance of killing whatever he hits, but it requires careful play and careful support to ensure he gets to actually hit what you want him to. You probably won't take him in every list either, as he'll be much more comfortable at the higher points levels (700+) where you can bring a couple of extra heroes.

Speaking of...

Heroes of Valour

Frealaf, First Marshal of the Riddermark

Frealaf is one of those heroes I expect to be F5 and 2A, so I'm always pleasantly surprised when I remember he's actually F6 and 3A. At just 100 points with the option for a horse, he makes a decent candidate to be your general at lower points levels. Defensively, he's slightly lacking at only D5, but he does have 3W and 3F to keep him going there at least. He's also perhaps best hiding behind his warband and popping around the flanks, which should keep him safe, as the main reason you'll be wanting to bring him along is his Lord of Harrowdale rule.

With Royal Guard limited to Helm's Warband, having a free upgrade for Warriors of Rohan in Frealaf's warband to Warriors of Harrowdale is a nice way to get a D6 frontline, thanks to Shieldwall (assuming he's in Line of Sight). A maxed-out warband can give you a seven-man-wide shieldwall with throwing spears in the back rank and a banner, all for 243pts (unless you want him on a horse, though I don't think that's overly necessary in most lists). Warriors of Harrowdale also get to re-roll failed Intelligence tests, nice for when you're facing Spectres or Sentinels that may want to ruin your Shieldwall.

Whilst Frealaf does only have 2 Might, if Hera is within 6" of him, he does get Master of Battle for countering your opponent's Heroics. On a 4+ you have a 50/50 chance of it working (plus the 50/50 roll off), but it could mean countering a key Heroic Move that allows you to take the initiative on the charge or even back away for another round of thrown spears. 

This rule does kinda make Hera a 70pt upgrade for Frealaf, but more on her later. 

Frealaf doesn't have a model yet, so I had Wulf donate his head for a nice proxy

Haleth, Prince of Rohan

The brother that follows in his father's footsteps, Haleth is ostensibly built to fight. At 125pts on an Armoured Horse with the option of Throwing Spears, he brings F6, S4, 3A and 3M to the table, plus Heroic Strike, which is the standard for a beatstick hero. Haleth is rather simple as it goes, and his job is clearly to be mowing through warriors. With Defender of Edoras, you want him in combat with a minimum of two enemies every turn, as he gets to re-roll any failed To Wound rolls when outnumbered.

Haleth actually works as a nice escort for Helm, the pair's natural killing ability should mean they are not going to end up surrounded, and with Heroic Combats could theoretically kill 16 models in a single turn (not that I expect to see that ever happen). Even without Helm, Haleth is a fantastic fighter for flanking enemy battlelines and levelling the playing field against high-model count lists.

He is a little fragile however, D6 and 3W whilst on an Armoured Horse with Horse Lord is always nice, but he only has a single fate point, so care should be taken to keep him alive.

Hama, Prince of Rohan

Hama is the Legolas to Haleth's Aragorn... sort of. He has a bow, a 3+ Shoot Value, Sharpshooter and Heroic Accuracy. Whilst he's not going to be winning any archery contests (his opponents are Elves, so fair enough), he does have the skills to snipe out the horses of dangerous heroes or potentially important support pieces like banners. At 90pts mounted, he's an excellent candidate for leading a small skirmish detachment of Riders of Rohan, kiting enemies with half moves, or tearing off to grab objectives whilst still contributing.

Combat-wise, he's a more standard Rohan hero; F5, S4, 2A, 2M, enough again for dealing with Warriors and maybe Captains or Minor Heroes. With D6, 2W, 2F and Heroic Defence, he could also make a serviceable roadblock against other more capable fighters. 

Despite the temptation to maybe keep him on the outskirts where he can shoot, he does also bring The Warrior Poet, which for a point of Will gives friendly Rohan models re-rolls on 1's when wounding for that turn. Whilst not groundbreaking, this could really bolster turns where the hammer meets the anvil to ensure an extra kill or two. He can do this three times per game, which coupled with the Army Rule Forth Eorlingas could make the army surprisingly killy for four whole turns of combat, or ensure Helm's Heroic Combats keep rolling.

Heroes of Fortitude

Hera, Daughter of Helm

As star of War of the Rohirrim, Hera doesn't necessarily get a star profile, but she does have some solid stats and some useful special rules. The aforementioned buff to Frealaf from Mutual Respect encourages you to keep her near him so he can counter enemy Heroics, and she is a solid candidate for helping him guard the flanks of that Warrior of Harrowdale shieldwall.

That's not to say she needs to be there, and Hera works well as a hunter, aiming to take out key supporting units in the opponents list (banners, horns, Shamen etc). At F5, S4, 2A and 3M she's yet another standard Rohan named hero, and Heroic Strike and Heroic Defence give her options depending on what she's facing. The key rule for her is Daughter of Rohan however. Assuming you can get her into one-on-one combats (no spear-supports either), she goes up to 3 Attacks and can re-roll natural ones when wounding. A nice healthy boost that can let her do her job, especially when mounted, assuming you can get her there. I struggled in a recent game and she never found herself in any one-on-one combats despite singling out Captains more than once, but there were an awful lot of goblins making that tricky for me.

To help get her where she needs to be, she gets the unique mount Ashere. Ashere gets Swift Gallop, an activatable rule that give a bonus 2" to her move distance and Woodland Creature. Whilst this does mean that Hera can't charge whilst using it, it's very nice for helping to set up unexpected flanks and get into positions to charge what you want to. It also could be the difference in reaching objectives or getting off of the board in several scenarios.

Finally, she does also have Spyglass, allowing her to see through Stalk Unseen which is situationly useful.

Olwyn, Shieldmaiden of Rohan

Olywn is built to be a budget roadblock. Whilst she brings a slight alteration on the standard Rohan statblock (F5, S4, 3A and 2M), she has Heroic Defence and Stalwart Fighter. This latter rule means she can only be wounded in combat on 6's, making up a little for her D5. Whilst this isn't natural 6's (so +1 bonuses and the like take affect), it does give her that extra little bit of survivability to go along with her 2W and 3F.

Light Armour also brings her up to D6 against shooting, and like most Rohan heroes she can take a horse, but at 80pts (100 with said horse) she's a solid edition to any list. 

Finally she has Sworn Protector (Hera), to make up for her average 5+ courage stat.

Captain of Rohan

At anywhere from 45-75pts depending on gear, Rohan Captains are still your bog-standard Captain profile with the standard Rohan special rules, and as with any list they are nice way to get extra warband slots and Might, but mostly importantly Heroic March. This last one is especially important as it is the only way to get March in the Army of Edoras, a useful niche where you may otherwise consider just bring Hera, Olwyn or Hama instead for the points.

With the combined-arms feel of this list, they could be very important for ensuring your infantry gets to where it needs to be in time. Even in a more cavalry-heavy or hero-heavy variant, Captains are still useful sources of Might and March and just simply being another body that's more expendable that the rest.

Minor Heroes

Lief, Page of Helm

Lief is the final hero profile available to the Army of Edoras and takes the role of Support Hero. F3, S3, 1A, plus his shorter stature isn't going to have him beating allegations of being a Hobbit in disguise. He at least has 2W and 1F to go with Heroic Defence in an emergency, despite only being D4, but don't expect him to be winning many fights, even on his horse.

Instead Lief's value comes from Orders from Edoras, and this is where his 50pts cost is being spent. With his 5 Will points, he has 5 once-per-game, single-turn 3" auras he can activate; Heroes getting free Heroic Combats, friendly Rohan models getting Fearless, removal of the -1 to hit for moving and shooting and a re-roll on To Hit, friendly Rohan models gaining Woodland Creature and Mountain Dweller, and last but not least, friendly Rohan models gaining 2" Move. 

This gives you a lot of options, despite it's smaller 3" range (a reason to mount him however for the larger base size). Skill is everything however, you'll need timing and positioning to be immaculate to get the most out of him. One turn he'll be using his Pseudo-March, then he'll have to run over to your riders/archers to give them a boost so they can make a hole in the enemy's formation, then back to the battleline to give them Fearless so they can charge something with Terror, then moving again to group with your Heroes to get off a big Heroic Combat chain. 

Somewhere amongst all that, the terrain aura could be used to ensure you can reach an awkward objective, or make a run for the board edge.

Expect to see Lief running all over the board, but at the same time being the target of heroes (especially in assassination) and bowfire (Light Armour is nice for the S2 and S4 archery at least, bringing him to D5). 

He might be a key piece in Army of Edoras lists and the secret sauce needed to elevate it.

Legacy - The King's Huntsman

With the Legacy document hitting just yesterday, I'd be remiss not to mention how they affect the list. It is a minor one, but the King's Huntsman is back! Whilst not the most popular option, I always quite liked the profile. He has a weird niche as a horseless Rohan hero, but focused instead on archery. Whilst it just made more sense to take Legolas or Haldir in most lists, he did have a place in the Theodred and Helm's legions, as both were limited on hero options.

With Army of Edoras, his niche is somewhat challenged by Hama, as both have Heroic Accuracy and Sharpshooter. However, Hama wants to be skirmishing and buffing the front-line, whilst the Huntsman works better as a backline sniper, preferably guarding an objective. He'll do that job much better than an regular Rohan Warrior or Rider as well thanks to his D5, 2W and 1F. Just don't expect him to fight too much, despite having 2 Might and S4, he's only F3 with 1 attack.

More than that, he also wields a Longbow for that juicy S3 and only fails In-the-Ways on a 1, making him a much more reliable sniper. Whilst it's situational, if he ever manages to land the final shot on a Monster (something that should happen more regularly this edition), he recovers all of his Might. 2 Might doesn't exactly go far, but spending all of it to guarantee the kill is FREE and that's awesome.

Any list where you have a spare 55pts he's worth a consideration, though he does compete there with a Captain on foot, so it depends if you need March or a dedicated Archer/Objective Holder. He's a minor hero also, so he could bring along a half dozen bowmen or a couple extra fighters for the battleline.


So, a fairly solid roster of heroes that includes a couple of synergies as well. With every single one of them able to be mounted this is a rival to the old hero-heavy Riders of Theoden legion (or even Kingdom of Rohan if you want Theodred), though with Eomer's buffs and Gamling's banner, Helm's boys might still be in second place here.

Rather, I think here that Army of Edoras is a prime foot-Rohan list that still allows you to bring a cavalry hammer for hitting power that lists like Defender's of Helm's Deep may lack. Your standard spear-supported battleline is made much better by the inclusion of Throwing Spears that not only forces the opponent to come to you, but also gives flexibility and skirmishing potential. Frealaf's warband with Shieldwall is a lovely defensive boost for D6 saving your from needing to use the more expensive Royal Guard as your frontline, which is great with them being limited to Helm's warband where they are much more useful as F5 charging cavalry. Or bring two shieldwalls, why not?

You may be limited with S3 warriors and S2 bows on the killing front, but there are several re-roll auras from the army bonus, Hama and Lief to subtly boost that killing power. Failing that, cavalry has always been great at stacking dice for more wounds, and Helm, Haleth and Hera are incredibly killy in the right circumstances. 

There's enough Strike to challenge monsters and other F7+ heroes, but you don't always have to fight those. Your heroes are much better geared towards mowing through Warriors or taking down Minor Heroes and Captains. You have roadblock options and can also kite fairly well with cavalry, so playing to objectives is much more in your favour, though if you're feeling lucky, back Helm or Haleth up with a banner and see what they can do.

Warriors

I'm not going to go into depth on the warrior options, as it's your normal Rohan spread of Warriors of Rohan, Riders of Rohan and Rohan Royal Guard. Outriders and Sons of Eorl from Legacy didn't make it into the list unfortunately. In either case, they the Warriors we've known and loved for many years now, so there's not much to cover. The Warriors are fairly cheap with solid profiles, Riders are the flexible skirmish cavalry they've always been and the Royal Guard are solid shock cavalry. You can get solid numbers with just the first two, and I think it's well worth bringing a decent group of them.

My Warriors of Harrowdale, a nice little upgrade to the standard profile. Plus they can double up as Helmingas in other lists!


Pros and Cons

Pros:
 - Solid hero roster.
 - Well-rounded troops.
 - Some synergy and good auric bonuses.
 - The Hammerhand!
 - Flexible Heroes and Warriors.
 - Great cavalry.

Cons:
 - Heroes can be pricey.
 - No F7+
 - Troops limited to S3 (mitigated somewhat with re-rolls).
 - Warrior F4+ limited.
 - No magic or magic resistance.

Finally they are an army of most F3, D5 Men in a world of F4 and Hatred, some of it specifically pointed at Rohan as a faction. These opponents are fairly common these days, so it could be a bit of an uphill battle in any competitive setting, but an canny player may be able to push past this handicap.

Army List

I of course have a few lists that may work to show just what the Army of Edoras can do:

Starting at 350pts:


I've gone here with the Frealaf/Hera combo, as I really do like what Frealaf brings to the table. He's a solid hero for this points level and the near-full warband gives a good number of bodies to avoid being outnumbered. Hera brings the supporting pieces with an archery triangle and a couple of Riders that can flank or run off to grab objectives. Hera herself can also hunt down the usual, such as banners, but also minor heroes that are more common at this points level.

We're relying on the throwing spears and Master of Battle here to help us dictate when the battle starts, with plenty of shooting to (hopefully) get the numbers advantage.

There is the option for swapping Hera out for a mounted Captain, which gives March and another mounted fighter, but this is down to personal taste.

This is the list I've run most recently. Once again I've brought that core of Frealaf/Hera with a full shieldwall and some extra bodies, archers and cavalry to form the core of the list. Accompanying them I've brought Haleth for some combat power with a cavalry entourage and a couple of extra archers. Otherwise, it works much as the previous list did.

It's a bit of an all-rounder, able to skirmish and shoot well, with a solid hammer-and-anvil setup. You want to whittle the enemy down with spears, whilst also plopping yourself down on an objective or blocking routes through terrain with the shieldwalls. Haleth really wants to be getting stuck in as he can very quickly chop through enemy warriors, but you still have to be careful not to let him get overwhelmed.

With more points, getting Hera on Ashere is an option for flexibility and once again consideration can be made for a Captain. You could also downgrade Haleth, perhaps to Olywn or Hama, giving much less combat prowess, but more bodies and either staying power or accurate shooting and combat aura. I may experiment with this later.
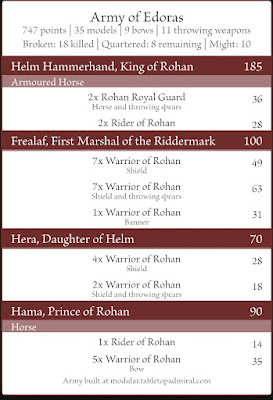
For the final "standard list" I want to run one that included Helm himself, but otherwise I've stayed consistent with the feel of the previous lists. Helm is a little less flexible than his son, but is backed up nicely by a pair of Royal Guard, and even Hama could run over to support him and ensure he gets off a big Heroic Combat with Warrior Poet.

For adjustments, you really have the choice between Hama's horse and Ashere. Hama can support Helm well and skirmish better whilst mounted, whilst Hera gets more proficient at her hunting role with Ashere. Once again, personal choice and who your opponent is matters here.

You don't have to run Helm of course, Haleth suits as a good substitute, though you lose the Royal Guard you can just bring more Riders, who are still F4 on the charge if near enough to either Haleth or Frealaf (depending on who is the General). Hama could be substituted for Olwyn if you don't feel you need the archery, but there is consideration for Lief here too. With more bodies on the field, his auras have more chance to have a greater affect, and without a Captain, his March-like ability pays well for getting early positions. I don't personally feel like I have the skill to pull off his abilities yet, but it's worth a try.


For the final list, I figured I'd build something Hero-heavy in the style of Riders of Theoden, and I have two:


This one does feel like an outing of the Royal family of Rohan (Frealaf being a cousin of course). We lack a hero banner, so a Rider has to bring one, then a second Rider and a some Royal Guard bring up the points and act as screening bodies. 

Helm and Haleth here are your focus, both of them are powerful combatants and with Helm's raw strength and free Heroic Combats and Haleth's wound re-rolls, you want them stuck in and mowing through warriors supported by the banner and Lief/Hama's auras.

Frealaf and Hera are there to watch the flanks, and whilst they are both solid fighters they're more fragile and have to picking their combats well. Targetting Minor Heroes is also key, to remove counter Heroics, but you'll be wanting to keep them close to each other to call your own Heroics and counter with Master of Battle. Everybody knows it by now, but this is key with all Cavalry and hero-heavy armies to keep momentum.

Obviously there is a choice here between Hama and Lief, both of which are great supports with slight variations. Hama is focused on his wounding aura and sniping opposing horses that may want to remove your cavalry bonuses, he can also fight decently well. Lief has some movement auras, plus the nice free Heroic Combat turn that pairs well with Forth Eorlingas for a potentially very powerful alpha strike turn. Again, personal choice at play here, and I can see arguments for either.


So that's a look at the Army of Edoras and by no means a fully exhaustive one, as it has plenty of options as you can well see. Potentially a bit of a sleeper pick compared to many of the other lists in the game, it really only lacks a top tier hero on the level or Aragorn or Glorfindel, but Helm by no means is far behind them in the rankings, and he has plenty of support to do the job.

If you enjoyed this, or have any thoughts, feel free to leave a comment. If you want to see what I'm doing hobby-wise, I have an Instagram @Manic.Hobbying.

Until next time, Forth Eorlingas!

Wednesday, May 21, 2025

A Tournament Journey Part 3: Nobody Tosses a Dwarf After-Report

If you've seen Part 2 already, then you'll be aware that I took the Defenders of Helm's Deep to a four game, 624pt tournament this past Sunday. Over in sunny Walsall, at Board in Brum, who are a great bunch and very welcoming. Like the previous event I attended, I figured I breakdown the games of the day, and see what lessons I could learn from each one, in an effort to improve my skills as a player.

Take a look at Part 2 again if you want to see my list.

 
Custom Event Dice

Game 1 - Assassination

The first game brought back a scenario from the previous version; Assasination. Theoretically, I had a decent chance here with Aragorn and Haldir, providing I could protect Theoden well enough.

My opponent was Thomas, who was fresh of a tournament win just the day before with his Buhrdur's Horde list.

Buhrdur
 - Hill Troll
 - Orc Warrior: Banner
 - 6x Orc Warriors: Shield
 - 6x Orc Warriors: Spear

Warg Chieftain
 - 2 Wild Wargs

Warg Chieftain
 - 2 Wild Wargs
 - 4 Orc Warriors: Orc Bow

Orc Captain
 - 5 Orc Warriors: Shield
 - 5 Orc Warriors: Spear

I chose my target as the Orc Captain, and in an attempt to be tricksy, set Haldir as my assassin. I believe Thomas' assassin and target was one of his Warg Chieftains and Theoden respectively.

Playing across a lovely rocky board with a Weathertop-style ruin on one side, the battlelines split down the middle either side of a rocky outcropping. Aragorn went left, at the largest group of Orcs, whilst Theoden led his shieldwall right, and Haldir sat in the middle with his archers. With Buhrdur waiting in ambush, Thomas kept most of his force hidden from my elven bowmen until the lines clashed, with his own Orc archers claiming Amon Sul and using it's pillars to hide and shoot down at Theoden's warband. I sent an elf to attack them, but he had a long climb ahead, only to die to Wargs near the end of the game.

When the lines clashed, disaster came in the form of the two Warg Chieftains chomping through most of the Royal Guard in one turn. This led me to panic and send Haldir off to fight alongside Theoden, on the complete opposite side of the rock from his target. For his part, the Orc Captain stayed hidden amongst the rabble and simply targetted warriors, whilst Aragorn got bogged down in kind. This did draw Buhrdur over to that side of the fight, giving Aragorn time to chop through a bunch of warriors, even using Heroic Strength with his free Might to get a couple of extra kills, but it was ultimately in vain as I wasn't able to even break the horde.

Theoden got chomped by the Wargs, and Haldir went down to Buhrdur. Haldir's death blow did at least wound the troll chief, giving me a sole VP for the game. Some concern that Buhrdur was a target for Aragorn to kill kept the two from fighting, but the game ended with him as the sole survivor.

I made many mistakes in this game. Fear of Buhrdur's Ambush led me to rush into combat in an attempt to kill as much as I could early, especially with his force hiding from being shot. This same fear also led to me ignoring the objective and sending Haldir the wrong way, though I'm sure this would've drawn the trolls over into a messier fight. Differences in deployment may have helped to secure me better shots early on to trim the horde and fight from an entrenched position. At the end of the day, it's a difficult one to say what I could've done better against a skilled opponent,

Final Result: 1VPs to 19VPs


Game 2 - Reconnoitre

This game featured a much more magical opponent, and something quite scary for my Rohirrim; Man-hating Morannon's and Blades of the Dead. Liam was a great opponent with his Minas Morgul, and both of us suffered with some unlucky rolls here and there.

The Witch King of Angmar: Fell Beast, Morgul Blade
 - Mordor Troll: War Drum
 - 6x Morannon Orc: Shield
 - 5x Mordor Orc Warrior: Spear
 - Mordor Orc Warrior: Two-Handed Weapon
 - Mordor Orc Warrior: Banner
 - Spectre

Ringwraith: Horse
 - 3x Mordor Orc Warrior: Shield
 - 4x Mordor Orc Warrior: Spear
 - 2x Mordor Orc Warrior: Two-Handed Weapon


Attempting to learn a lesson from last game, I tried to set up firing lines with the elves again, trying to keep it in mind to target the mounts of the two Wraiths. Once again I was thwarted my terrain, with a large central building blocking sight for much of the game. Aragorn raced forwards to try and catch the Ringwraith, as Theoden was running late with most of the battleline and Haldir's boys spread out to try and get a shot wherever they could. With my force being all on foot, I didn't think much towards escaping myself, just trying to stop Liam and kill the Witch King.

Luck was on my side for much of the game as magic either failed or was resisted, including that of the Spectre trying to pull my spear-supporting warriors away. I managed to catch the Witch King in combat and kill his mount, though Fate saved him from dying to Aragorn.

The other Ringwraith made a run for it, and eventually Haldir was able to put an arrow into his mount thanks to Sharpshooter, but he was still able to get off the board next turn to net VPs.

Whilst Aragorn, Theoden and a number of Royal Guard were distracted by the Witch King, my warriors fell quickly to the Orcs thanks to their Hatred boosts and ignoring Armour, so I yet again found my force breaking.

Post-game it's clear that I spent more time trying to kill the Fell Beast than simply trying to kill the Witch King, for which I had plenty of dice to push through his Fate. Haldir was also out of the fight in trying to hunt the other Ringwraith, which may have slowed me down. With archery failing, I did start moving elves towards the other board-edge on a long flanking run, but they were several turns short. It feels like yet another game where my archery just wasn't in play, wasting a good chunk of my army, though with this scenario it may have played in my favour as it slowed his advance and allowed me to take the fight in the centre of the board, despite the Troll's War Drum giving him a speed advantage. Unfortunately, it was simply another loss, though a closer one.

Final Result: 0VPs to 8VPs.

 
Game 3 - ???

The third game brought back another older scenario, this time against Thomas' (a different Thomas) Lothlorien. Thomas was having a poor day of it and struggling with the nuances of the new version of Lothlorien, so we vowed to simply try and have fun with it.

Galadriel, Lady of Lothlorien: Mirror of Galadriel
 - Galadhrim Warrior: Banner
 - 5x Galadhrim Warrior: Lorien Guard, Shield, Elven Spear
 - 5x Galadhrim Warrior: Lorien Guard, Sheild

Celeborn, Lord of Lothlorien
 - 7x Lothlorien Warrior: Elf Bow

Haldir, Galadhrim Captain: Elven Cloak, Elf Bow, Heavy Armour
 - 4x Galadhrim Warrior: Elven Spear


I deployed Theoden first in my Side A corner, then placed Aragorn on the opposite side before placing Haldir alongside Theoden. I reasoned that Aragorn was most able to hold his own and the bigger contingent would draw more focus. Thomas deployed the Lord and Lady together with thier battleline, and his own Haldir in the opposite corner.

Ignoring the objectives early on, I ran Theoden's shieldwall at the Elven one, Haldir's group shooting past them to thin out the elven battleline. Aragorn's group ran towards the objectives initially, using the terrain to hide from Elven archery as my previous opponents had done. They eventually made it into combat with the Lothlorien bowmen and were able to wipe them out, despite Aragorn trying to lose with a triple one roll. Haldir later took out the survivors as they tried to take the objectives.

Aragorn himself went over to join the combat against the Lord and Lady and their entourage. Whilst I'd managed to thin their numbers with bowfire, I lost a number of the initial combats, and Celeborn's +1 to wound aura helped the Lorien Guard to level the numbers. Haldir and Theoden spent a good few turns transfixed, Haldir himself being a statue for going on 4-5 turns. The King eventually made his way into combat with Galadriel however, and with heroic moves, I managed to take initiative with Aragorn slaying the banner bearer, then fighting alongside Theoden to kill Galadriel.

At this point I had once again broken, and an unlucky roll saw Theoden flee the field the turn after Galadriel fell, with no Will left to boost it. The game lasted a few rounds past the potential ending point due to dice rolls, but it did end with more of the objectives in Lothlorien's hands than Rohan's.

A fantastic game that was fun for both of us.

Final Result - 7VPs to 13VPs


Game 4 - Domination

The final game of the day was against Sean's Army of Carn Dum. I'd heard this army was in the room earlier in the day, on account of it fielding no less that three Hill Trolls. As I'm looking to build a Carn Dum army myself, it would be fun to see how it plays. Sean later went on to win best painted for the day, and it was a truly nicely looking army.

Aldrac, Warlord of Carn Dum
 - 2x Hill Troll
 - 10x Carn Dum Warrior: Spear
 - Carn Dum Warrior: Banner

Fraecht, Vassal of the Witch King
 - 6x Angmar Orc Warriors: Shield
 - 3x Angmar Orc Warriors: Bow
 - Hill Troll

2x Warg Riders (unsure on warband and equipment, looks like his submitted list missed them off).


With objectives at play and having ignored them in the previous game, I pushed forward quickly to engage, but did leave a firing lane open enough for Haldir's group to shoot two wounds off of one of his trolls. On the left flank, Aragorn's two archers shot down a Warg and it's Rider whilst walking forwards to shoot the other. On a turn with priority, I elected to charge in rather than allow him to get the +1FV. This may not have been the right choice, as backing up into spear range and shooting for another turn may have finished off the troll and netted me a warrior kill or two.

Aragorn got stuck into the Orcs and eventually took down the left-flank troll, his archers taking down the second Warg Rider in combat. Haldir left behind a lone elf on an objective and ran forwards to support combat. Finally, Theoden engaged the men of Carn Dum, hiding amongst the Royal Guard to try and avoid Aldrac and the third troll.

Unfortunately, Aldrac's free Heroic Combats did allow him to get at the King of Rohan and killed him in single combat with 3 wounds. Haldir struggled for a number of turns to take the centre-trolls final wound, almost dying before Aragorn ran over to lend a hand. Whilst I kept calling Moves as needed to avoid the F4 and keep fights for my basic warriors at least tied, I yet again found my army ground down into being Broken and eventually Quartered, ending the game.

What worked for me was the two Galadhrim managing to clear and take an objective in his deployment zone, whilst also shooting his sole warrior off of another. He had managed to get an objective on my side and had the majority on the centre objective, but the game ended in a draw with both armies being broken and both leaders being either dead or wounded, as Aragorn had put a wound on the Warlord towards the end.

Another fun game and it was fun to see the strengths of Carn Dum in play. The Hill Trolls are certainly scary and only really Aragorn and archery was able to deal with them. Likewise Aldrac hits hard and is a big threat on his own. Fraecht I did not see perform all too much, and I don't recall any of his Incantations doing much, though Sean did activate them.

Final Result: 8VPs to 8VPs


When the dust settled, I sit once again at last-place-but-one, with three losses and a draw. On paper it does not really look like I've improved at all in my gameplay, but whilst I can certainly see where I've made rash decisions and rushed in too quickly in places, I can also see where I've made smart choices on the small scale. That might be ordering the combats to avoid being trapped, or moving a model to create a control zone blockage. There were also cases where I could not do any better than the dice would allow (Aragorn's triple ones for example).

That said, I'm still playing for fun, and I was definitely paired up against some skilled opponents. Thankfully they were happy to give me pointers and I've been able to learn from each player directly or indirectly.

Board in Brum continues to be a fanstastic environment, and the crowd there are a good bunch.

Next time, I'm off to play in a brewery with 200pts of Carn Dum. Until then!